
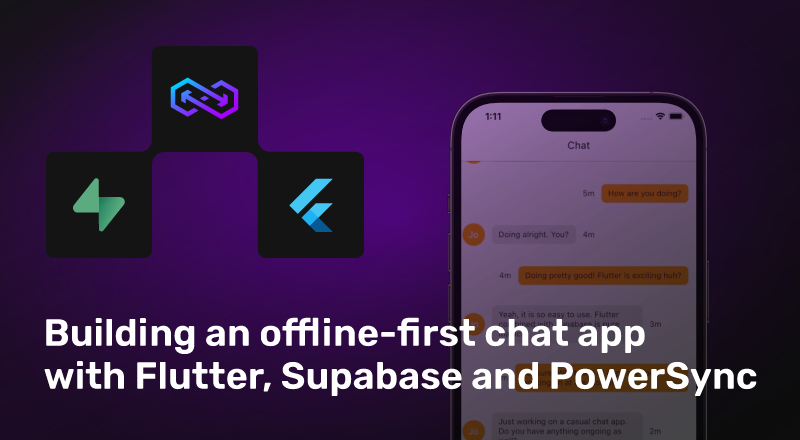
Offline-first apps feel instant to use because they work with a local in-app database, are functional even if the user’s network connection is interrupted, and provide multi-user real-time collaboration. If you're new to PowerSync, start at this post for an introduction to the technology.
This tutorial walks through building an offline-first chat app, using the Supabase Flutter chat app tutorial as a starting point and then integrating PowerSync. It should take ~30-45min to complete.
Before proceeding, you should have accounts with both Supabase and PowerSync. If you don't have accounts yet, don't worry — you can get started for free with PowerSync here, and with Supabase here. You should also have Flutter set up.
For a video version of this tutorial, see here:
Tutorial Overview
- Set up Supabase project and publication to PowerSync
- Clone Supabase Flutter chat app
- Run the app in its online-only form
- Set up PowerSync service
- Integrate PowerSync's Flutter SDK to make the app offline-first
1. Set up Supabase project and publication to PowerSync
Complete only the following two steps in the Supabase Flutter chat app tutorial. This should take less than 2 minutes.
You should now have two tables in your Supabase project: [.inline-code-snippet]messages[.inline-code-snippet] and [.inline-code-snippet]profiles[.inline-code-snippet] You can now exit the Supabase Flutter chat app tutorial.
Allow Supabase to publish data changes to PowerSync by running the below SQL statement in your Supabase SQL Editor:
2. Clone Supabase Flutter chat app
Clone the Supabase Flutter chat app code from this template with this command:
Make sure you're in the newly cloned directory:
Install dependencies by running this command:
Open the project in VSCode — a quick way to do this is with the [.inline-code-snippet]code .[.inline-code-snippet] command.
You don't want to commit your secrets into GitHub so copy and rename the [.inline-code-snippet].env.template[.inline-code-snippet] file to [.inline-code-snippet].env[.inline-code-snippet].
Replace the placeholder values in that file:
- Find your project URL in Supabase, go to Settings > API > Copy Project URL and replace the placeholder URL value at [.inline-code-snippet]SUPABASE_URL=[.inline-code-snippet].
- Find your anon key just below that at [.inline-code-snippet]anon[.inline-code-snippet] [.inline-code-snippet]public[.inline-code-snippet] and replace the placeholder value at [.inline-code-snippet]SUPABASE_ANON_KEY=[.inline-code-snippet].
Save that file.
Because of the way signups are handled in the Supabase Flutter chat app, we need to set up a Postgres function and trigger to copy usernames into the [.inline-code-snippet]profiles[.inline-code-snippet] table (see this section in their tutorial if you want to learn more). To do this, run the following SQL in the Supabase SQL Editor.
Back in VSCode, go to the lib folder.and take a look at the code in the [.inline-code-snippet]main.dart[.inline-code-snippet] file:
This code first loads that [.inline-code-snippet].env[.inline-code-snippet] file that we just created and then initializes Supabase using the project URL and the anon key in that file. It then runs the app.
The app itself has four pages:
1. Splash page [.inline-code-snippet]splash_page.dart[.inline-code-snippet]
The splash page checks if the user is currently logged in or not. If not, it takes the user to the register page, otherwise it takes the users straight to the chat page.
2. Register page [.inline-code-snippet]register_page.dart[.inline-code-snippet]
The register page lets users sign up with email and password. It also allows users to skip this step if they already have an account, with a button which takes them to the login page.
3. Login page [.inline-code-snippet]login_page.dart[.inline-code-snippet]
The login page lets users log in with their email and password.
4. Chat page [.inline-code-snippet]chat_page.dart[.inline-code-snippet]
The chat page opens up a message stream from Supabase which binds to a [.inline-code-snippet]List[.inline-code-snippet] widget that streams messages. There's also a send button which calls a [.inline-code-snippet]_submitMessage()[.inline-code-snippet] function that inserts a row into the [.inline-code-snippet]messages[.inline-code-snippet] table with [.inline-code-snippet]profile_Id[.inline-code-snippet] and [.inline-code-snippet]content[.inline-code-snippet].
3. Run the app in its online-only form
In VSCode, click on [.inline-code-snippet]main.dart[.inline-code-snippet] and then select a target device (e.g. an Android emulator) in the bottom right to start debugging by clicking Run > Start Debugging from the main IDE window, or by pressing F5. See Flutter docs for more detailed instructions.
Run the app on a second device through the same process or from the command line:
For easier testing, in your Supabase dashboard, go to Authentication > Providers > Email > Toggle Confirm Email. This will remove the need to verify test user email addresses.
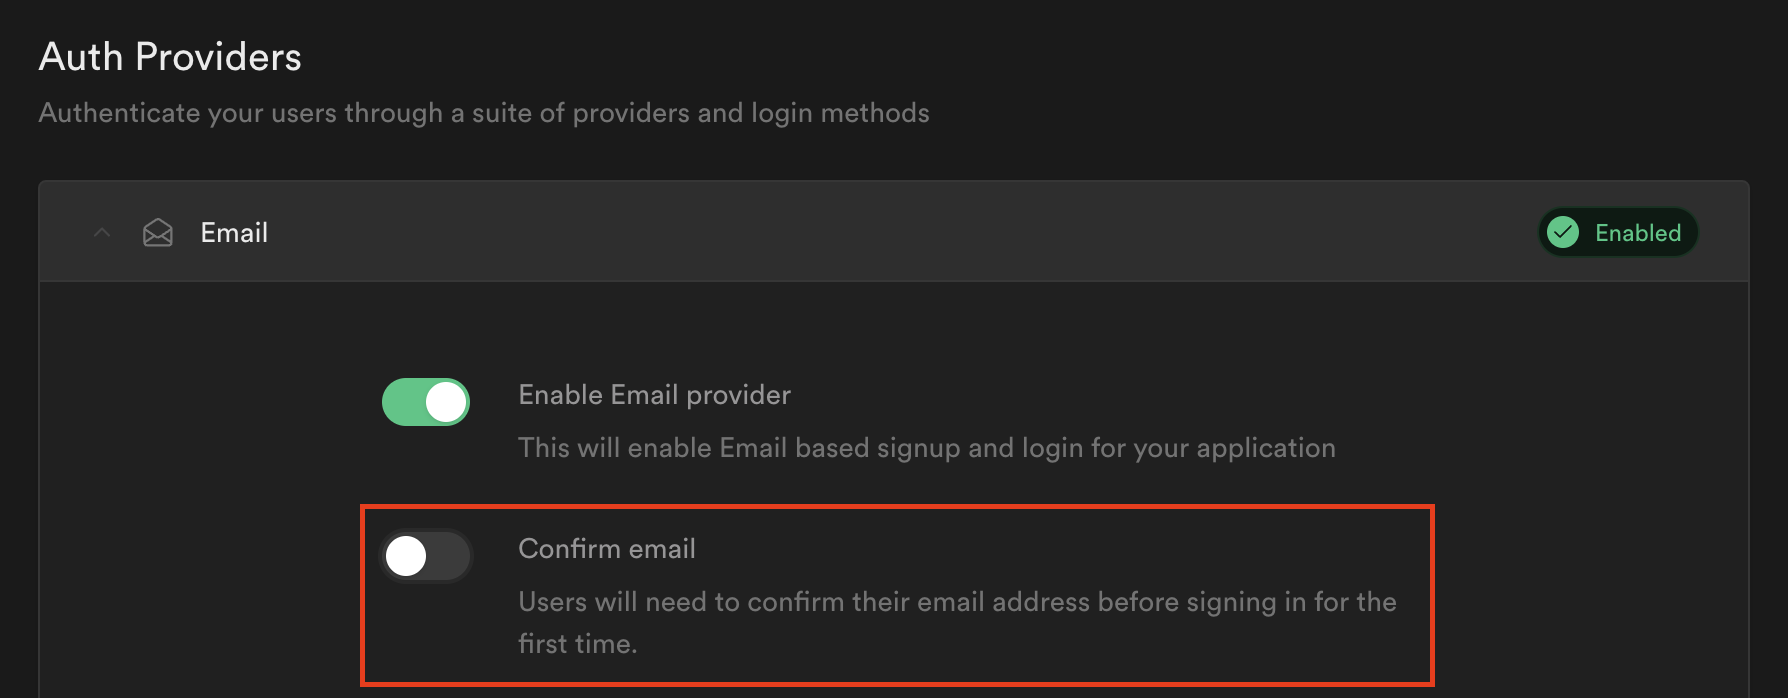
Remember to hit save in the bottom right:

On each different device, create a unique user through the register page and log in with that user. Once logged in, each user should be at the chat page in a live chat with the other user.
At this point you'll be able to see certain limitations in the online-only app. For example, users cannot load the app or use it while offline.
Let's change that by making the app offline-first.
4. Set up PowerSync service
If you don't have a PowerSync account yet, don't worry, you can get started for free.
Create a new instance of the PowerSync service and connect it to your Supabase project by following these steps:
- Log in to your PowerSync dashboard.
- Create a new instance of the PowerSync service and give it a name. The Edit Instance modal will then open (to open it any other time, right-click on the instance in the left sidebar).
- Go to the DB Connections tab. Now navigate to your Supabase dashboard to find your database URI. In the relevant Supabase project go to Settings > Database and uncheck "Use connection pooling" both under the Connection string and Connection parameters headings. Now copy the URI under the Connection string heading. Back in your PowerSync dashboard, paste that Supabase URI value in the URI field on the Edit Instance modal. This should autofill most fields in this tab.
- Next paste your Supabase database password in the Password field and toggle Allow querying data. Click Test connection to validate everything works.
- Now go to the Client Auth tab and and check the Use Supabase Auth checkbox. Click Save.
See this chapter in the Supabase integration video for a visual walkthrough of the steps above.
You should now see the [.inline-code-snippet]public.messages[.inline-code-snippet] and [.inline-code-snippet]public.profiles[.inline-code-snippet] tables from Supabase listed under the PowerSync instance you created (other schemas and tables that PowerSync detects in your database will also be listed).
Configure Sync Rules
On the PowerSync dashboard, open the [.inline-code-snippet]sync-rules.yaml[.inline-code-snippet] file in the left sidebar and delete all existing code.
For this tutorial, we'll simply sync all profiles and all messages to all users. To do that, paste the following into that file:
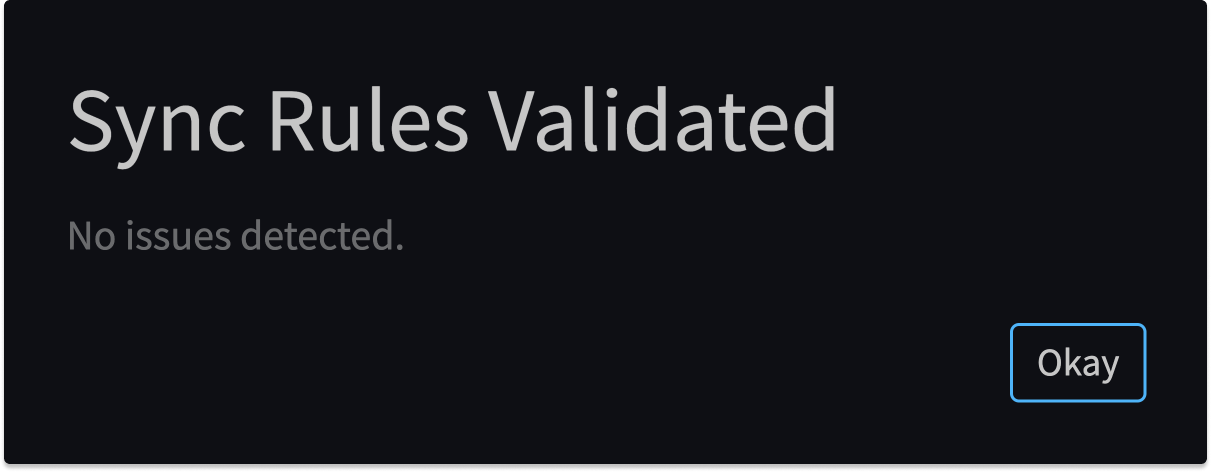
Click Validate in the top right of that panel and select your instance as the source to validate against. You should see a response of No issues detected, like this:
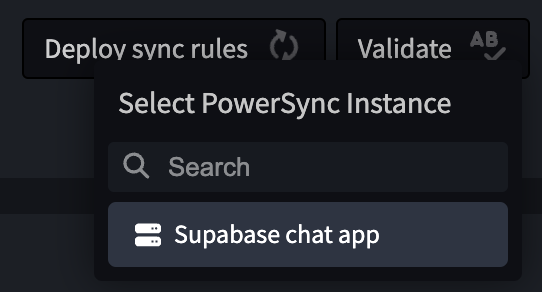
Click Deploy sync rules and select the instance you created to deploy against, e.g.:
Wait a few moments for the deployment to complete. Now that we have an instance of the PowerSync service set up, we need to wire it up to the app through the PowerSync SDK to get an offline-first architecture.
5. Integrate PowerSync's Flutter SDK to make the app offline-first
Install the SDK
Ensure you’re in the correct directory, then add the PowerSync SDK:
Navigate to your project in VSCode. In the lib folder, create a new file called [.inline-code-snippet]powersync.dart[.inline-code-snippet] where we'll add some PowerSync-specific code.
Import the PowerSync SDK and Supabase SDK:
You'll also want to import some packages to make managing paths easier, as well as the dotenv package:
Under that, add a global handle to the PowerSync database, like this:
Instantiate the PowerSync in-app database
You need to instantiate the PowerSync database — this is the core managed database. Its primary functions are to record all changes in the local database, whether online or offline. In addition, it automatically uploads changes to your app backend when connected.
In the same [.inline-code-snippet]powersync.dart[.inline-code-snippet] file, we'll use the [.inline-code-snippet]openDatabase()[.inline-code-snippet] method (docs) to instantiate the local SQLite database.
The constructor above requires a client-side schema and a path to the actual database file in the app. We'll create the client-side schema in the next section below.
Configure the path value
For the path, it works well to abstract path logic. Do this with a [.inline-code-snippet]getDatabasePath()[.inline-code-snippet] method, which you can paste above the [.inline-code-snippet]openDatabase()[.inline-code-snippet] code:
[.inline-code-snippet]getDatabasePath()[.inline-code-snippet] returns a string which appends the current application directory with the filename of the database, in the case of this example, that is "powersync-demo.db". It uses the uses the path_provider package.
Now set the value of the path in the [.inline-code-snippet]openDatabase()[.inline-code-snippet] constructor to call the [.inline-code-snippet]getDatabasePath()[.inline-code-snippet] method like so:
Configure the schema
Now for the schema. Complete the steps in the Implement client-side schema section below. Once you've done that, continue by importing the [.inline-code-snippet]schema.dart[.inline-code-snippet] file into the [.inline-code-snippet]powersync.dart[.inline-code-snippet] file like so:
Your [.inline-code-snippet]openDatabase()[.inline-code-snippet] constructor is now ready to initialize the database, call [.inline-code-snippet]db.initialize()[.inline-code-snippet] to do that:
Integrate with Supabase client SDK
A few steps are required to make sure the PowerSync and Supabase SDKs work well together. The first thing to do is move the Supabase initialization code into the [.inline-code-snippet]openDatabase()[.inline-code-snippet] constructor. Navigate to the [.inline-code-snippet]main.dart[.inline-code-snippet] file, and find this:
Cut that code, go back to the [.inline-code-snippet]openDatabase()[.inline-code-snippet] constructor in the [.inline-code-snippet]powersync.dart[.inline-code-snippet] file, and paste it there so that it looks like this:
Now go back to the [.inline-code-snippet]main.dart[.inline-code-snippet] file and remove the Supabase and dotenv packages by deleting these two lines in the import section:
Import the [.inline-code-snippet]powersync.dart[.inline-code-snippet] file and add a call to [.inline-code-snippet]openDatabase()[.inline-code-snippet] in the [.inline-code-snippet]main()[.inline-code-snippet] function like so:
We're not quite done here, but the last few steps require some helper auth methods that we'll get to later in this tutorial.
Connect the in-app database to Supabase and the PowerSync service
Back in the [.inline-code-snippet]powersync.dart[.inline-code-snippet] file, below the [.inline-code-snippet]openDatabase()[.inline-code-snippet] constructor, we'll create an instance of the [.inline-code-snippet]PowerSyncBackendConnector[.inline-code-snippet] (docs) which does two things:
- Uploads changes made on the local database to Supabase with the [.inline-code-snippet]uploadData()[.inline-code-snippet] method.
- Gets credentials to connect to the PowerSync service with the [.inline-code-snippet]fetchCredentials()[.inline-code-snippet] method.
After implementing these two methods, the SDK will take care of uploading local data changes to Supabase, and then connecting to the PowerSync service to download any data updates from Supabase as specified in your sync rules. It will automatically handle retrying if the network fails.
Before getting to the methods, we need to specify that this connector takes [.inline-code-snippet]db[.inline-code-snippet] as a parameter, like so:
The uploadData() method
The [.inline-code-snippet]uploadData()[.inline-code-snippet] method gets called by the SDK whenever there's data to upload, whether the device is online or offline. If the call throws an error, it will be retried periodically until it succeeds.
In the [.inline-code-snippet]uploadData()[.inline-code-snippet] method we'll use the [.inline-code-snippet]getNextCrudTransaction()[.inline-code-snippet] method (docs) to check whether there are any transactions to process. If there are, we'll upload them to the Supabase RESTful API, PostgREST.
We'll iterate through every operation in the [.inline-code-snippet]transaction.crud[.inline-code-snippet] object, which is a list of all client-side changes (docs). We'll have to map the operations to what Supabase will accept like so:
- put –> upsert
- patch –> update
- delete –> delete
For every operation, we'll evaluate what type it is and then perform the relevant update. Once we've iterated through all operations, we can complete the transaction which means that all operations were successfully applied against Supabase.
We also need to monitor whether there are any errors returned from Postgrest. We're specifically interested in whether the response codes correspond to codes we know are fatal (i.e. we cannot recover from them by retrying). Instead of blocking the rest of the upload queue, we'll simply mark a specific transaction as completed (note that errors are typically the result of bugs in your code and in a production environment you'll want to save failing records somewhere else in order to prevent data loss and allow debugging).
Here is the code that will do all that:
We also need to list the fatal response codes that we're referencing, do that by pasting the following code snippet below your import section:
The fetchCredentials() method
Now for the [.inline-code-snippet]fetchCredentials()[.inline-code-snippet] method. Paste this below the [.inline-code-snippet]uploadData()[.inline-code-snippet] code snippet:
This [.inline-code-snippet]fetchCredentials()[.inline-code-snippet] method will return [.inline-code-snippet]PowerSyncCredentials[.inline-code-snippet] (docs). You'll need to pass two parameters:
- the endpoint that the PowerSync service will connect to, and
- a token to authenticate the user.
You can find the relevant endpoint on your PowerSync dashboard by right-clicking on [Instance Name] > Edit instance > Copy Instance URL, e.g:
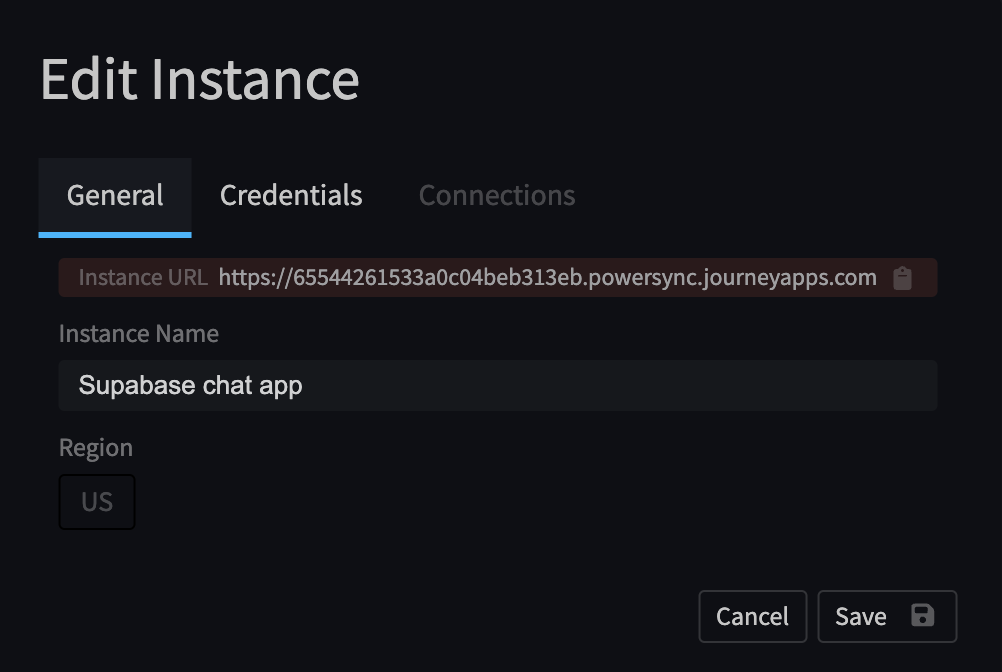
Copy your Instance URL and set it as your endpoint value, pasting it in single quotes.
We'll use the Supabase [.inline-code-snippet]user access token[.inline-code-snippet] as the token parameter. We'll first do a null check on the session to see if the user is actually logged in and if they are, we'll extract the token, like so:
Implement client-side schema
The schema is the application-level view onto the underlying SQLite data. We'll define our client-side schema by going to lib > models and creating a new file called [.inline-code-snippet]schema.dart[.inline-code-snippet]. Import the [.inline-code-snippet]powersync[.inline-code-snippet] package, set [.inline-code-snippet]schema[.inline-code-snippet] as a constant but don't assign a value to it just yet:
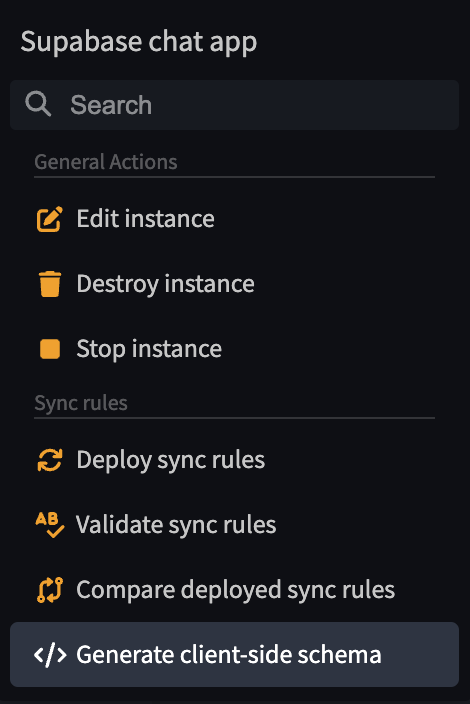
Go to your PowerSync dashboard, right-click on the name of your instance in the left sidebar and select Generate client-side schema. Select Dart as the language.
Copy the generated schema into your [.inline-code-snippet]schema.dart[.inline-code-snippet] file so that it looks like this:
Now you can complete the steps for instantiating your in-app database.
Implement auth methods
Check if a user is logged in
We'll connect the in-app database to the PowerSync service with the [.inline-code-snippet]db.connect()[.inline-code-snippet] method. However, we only want to call this method if users are logged in. To check if users are logged in, we'll implement a helper method called [.inline-code-snippet]isLoggedIn[.inline-code-snippet].
Do this above the [.inline-code-snippet]openDatabase()[.inline-code-snippet] constructor in the [.inline-code-snippet]powersync.dart[.inline-code-snippet] file, with this code that checks whether a user has an access token, and is therefore logged in:
Now we'll add logic that relies on this helper method and calls [.inline-code-snippet]db.connect()[.inline-code-snippet] if a user is logged in:
[.inline-code-snippet]db.connect[.inline-code-snippet] takes a connector as an input. We want that to be the [.inline-code-snippet]SupabaseConnector[.inline-code-snippet] but we'll define that outside of this logic because we'll re-use it later, like so:
Listen for user auth state changes
Since a user's authentication state can change over the course of their use of the app (they can sign in or sign out, their JWT can expire, etc.), we want our [.inline-code-snippet]openDatabase()[.inline-code-snippet] constructor to be aware of that.
Add the following below the [.inline-code-snippet]if (isLoggedIn())[.inline-code-snippet] snippet:
This uses the [.inline-code-snippet]onAuthStageChange.listen()[.inline-code-snippet] to check a user's authentication state and disconnects the database if they are signed out or fetches new credentials if their token has been refreshed.
You've now completed implementation of the [.inline-code-snippet]openDatabase()[.inline-code-snippet] method 🎉
Wire up in-app database calls to UI
Create data objects from in-app database
In the messages model
In [.inline-code-snippet]messages.dart[.inline-code-snippet], import the global db object that we defined in the [.inline-code-snippet]powersync.dart[.inline-code-snippet] file as well some SQLite helpers from the PowerSync package, which we'll give the name [.inline-code-snippet]sqlite[.inline-code-snippet]:
Because we want to instantiate a message object from a database row, we'll need to add a factory constructor we'll name [.inline-code-snippet]Message.fromRow()[.inline-code-snippet] which will take a SQLite row and a user ID as parameters:
Now create a method we'll name [.inline-code-snippet]watchMessage()[.inline-code-snippet]. Here we'll use the [.inline-code-snippet]watch()[.inline-code-snippet] method (docs) which executes a read query every time the source tables are modified. The [.inline-code-snippet]watchMessage()[.inline-code-snippet] method takes a User ID as a parameter and returns the [.inline-code-snippet]db.watch()[.inline-code-snippet] method which will execute a SQL statement to get the relevant messages for the user, ordered by their created date. We'll use the [.inline-code-snippet]fromRow[.inline-code-snippet] method to map results and cast them as a list with growable set to false:
Lastly, create a static method that we'll name [.inline-code-snippet]create()[.inline-code-snippet] which takes [.inline-code-snippet]profileId[.inline-code-snippet] and [.inline-code-snippet]content[.inline-code-snippet] as parameters and uses the [.inline-code-snippet]execute()[.inline-code-snippet] method (docs) to insert new messages into the messages table, like this:
In the profile model
Go to [.inline-code-snippet]profile.dart[.inline-code-snippet] and import the global db object and SQLite helper package as above.
Now implement a similar factory constructor for the profile object. The main thing to remember here is that it must match the schema you defined:
Create a method [.inline-code-snippet]findProfileByID()[.inline-code-snippet] that returns a Profile using the [.inline-code-snippet]get()[.inline-code-snippet] method (docs):
Wire up chat page to in-app database
Stream messages
In [.inline-code-snippet]chat_page.dart[.inline-code-snippet], find the [.inline-code-snippet]_messageStream[.inline-code-snippet] snippet and replace the code from the Supabase demo with a call to the static method we defined above so that it looks like this:
Set profile
Instead of extracting the profile from data, we can now set it directly. To do this, update the [.inline-code-snippet]_loadProfileCache[.inline-code-snippet] snippet to call the [.inline-code-snippet]findProfileById()[.inline-code-snippet] method, like this:
Create message
Find the [.inline-code-snippet]_submitMessage()[.inline-code-snippet] snippet and update it to use the static [.inline-code-snippet]create()[.inline-code-snippet] method that we defined above, like this:
Implement Logging
It's recommended to implement logging for your app but we won't go through the steps to implement that here. Refer to the complete example implementation below to see how.
Complete Implementation Available
An example with everything above implemented (including logging) is available here.
🎉🎉 That's it! You've completed the offline-first chat app tutorial 🎉🎉